Home ⁄ Archive by Category "Home"

Houzz Tour: Light and Lovely Home with a Distinctive History

It may be hard for some people to imagine living in the house they grew up in. When it’s working with an older house, or trying to overcome your parent’s design, the idea can be somewhat overwhelming. However, for Trina McNeilly, who authors the blog la la Lovely, it’s been a welcome challenge to create her childhood home outside of Chicago her own. “It may be quite wonderful, and fairly strange all at the exact same time,” she states.

With four kids in the house, McNeilly’s learned to create smart, easy, and creative adjustments which are cheap and kid-friendly. Above all else, she wants this house to reflect her own personal style, without losing all the excellent features that she grew up adoring. “I understand that if, or if, I ever move, I’ll dream of this house constantly,” she states.

“I’ve important decorating ADD,” McNeilly states. “Once I say I’m going to focus on a specific space, I inevitably find a million items for every other room in the house and become distracted.” A number of the goods in McNeilly’s house are hand-me-downs out of her parents who she is repurposed for an entirely new appearance.

All of these pieces help keep the decoration in a similar fashion that she grew up with, but with her own special touch. The rest of the pieces in her house came from internet shopping deals and occasional excursions to local shops and stores in Chicago. The end result is an eclectic and unique house that has been the perfect house for this family of 6.

The real showstopper from your family’s living area is an outside swing out of IKEA installed on a single side of the expansive space. “The swing provides hours of enjoyment during our long winters,” states McNeilly. “Now the kids want a slip to the basement!”

Swing: EKORRE, IKEA

McNeilly found the quirky yellow arm chairs on their way to the trash outside of a house in her area. She rescued them and has plans to recover them. For today they include a few interesting colour to the home’s living space.

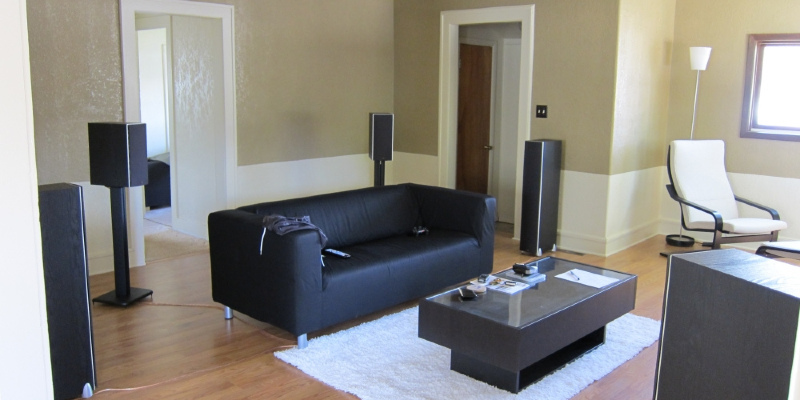
Couch: Clayton Marcus
Wall map: Plan de Paris Wall Map

The knock-off Ghost Chairs in the dining area is another favorite find. “They were a stealthey seem fantastic, and they work great with all the kids,” McNeilly states. The contemporary plastic chairs comparison a rich wooden table and natural looking rug underneath.

Table: Z Gallerie
Carpet: World Market
Centerpiece: One of a kind pottery piece from Anthropologie
Pendant: Pottery Barn
Chairs: InteriorExpress.com

One of the great components of redecorating this house was that McNeilly was able to completely indulge in her love for chandeliers, even installing one in her master bathroom. The easy crystal adds only a small bit of luxe to this simply made area.

Chandelier: Schonbeck

The empire chandelier in the master bedroom is just one of McNeilly’s beloved bits. “I’ve something for chandeliers, however this one is extra special,” she states. “It’s old and it sparkles, what could be better than that?”

Chandelier: Antique out of Euro Trash
Headboard: Z Gallerie
Quilt: West Elm
Pillows: Anthropologie

The couple chose to keep their bedroom in an easy white palette to help the space feel relaxing and soothing. Instead of carpeting, they laid down pine planks and painted them white. “It’s the biggest risk I’ve taken up to now,” she states.

Bench: Antique from Euro Trash

McNeilly setup a small workspace for herself in 1 corner of the massive master bedroom. The chair and desk were both hand-me-downs from her daddy. She bothered and refinished the desk in a gray colour, and then had the seat recovered in a plush green velvet.

Table lamp: House Goods
Wall color: Moccasin, Benjamin Moore

In another corner of the master bedroom, McNeilly set up a snug little spot for her baby son, Rocco. An IKEA crib is accented with stump side tables along with a lambskin for an earthy, cozy appearance.

Wall artwork: Debbie Carlos
Crib: IKEA

One of the spare rooms has been changed into a playroom for the four McNeilly kids. The armoire about the far wall was McNeilly’s mum’s, and has been distressed and humiliated for a fresh new appearance.

Rug: STOCKHOLM RAND, IKEA
Kids table and chairs: Pottery Barn Kids
Kids play furniturePottery Barn Kids

Instead of using the typical LACK wall shelves from IKEA, McNeilly came up with a creative idea and used the brand’s BEVKAM spice racks for wall mounted shelves with an added railing for security. She just spray painted all of them white, and installed them directly on the wall.

Silver poufs: Target

In her oldest son Luke’s area, McNeilly put in a pair of bunk beds — perfect for those instantly play dates. A chalkboard wall promotes creativity, and eliminates the need for important wall artwork.

Bunkbeds: Pottery Barn Kids
Bedding: Batman and Spiderman sheets out of Pottery Barn Kids, Star Duvet and Shams from IKEA

Ella is the only daughter from the McNeilly home, so she went all-out with her bedroom decoration. Pink and white bedding, vivid pink accents, along with a super shiny flea market disco ball gave her a perfectly girly bedroom.

Bedframe: Macy’s
Bedding: Bed Bath & Beyond. Pink floral duvet and shams, gift
Blue polka dot pillow: Anthropologie
Pink seat: Euro Trash, reupholstered

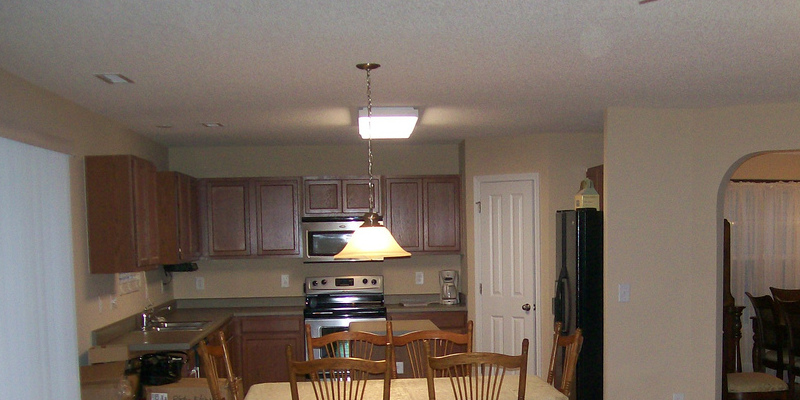
Even though McNeilly loves her house, 1 room she would love to remodel is your kitchen. It was remodeled by her mum, and is a lovely blend of dark wood and granite, but is not really McNeilly’s style. She dreams of an all-white kitchen with marble countertops, however, the current setup does the trick for the time being. “I think that the white kitchen might need to wait for my one-day-someday-house,” she states.

Barstools: Pier 1 Imports

McNeilly’s design is sophisticated, but since this is a house with four kids, there is also a distinct sense of playfulness throughout. A magnetic chalkboard wall permits the youngsters to (temporarily) decorate their house too!

The covered back porch is where the family loves to spend summer nights. The collage on wall has been made by McNeilly’s husband as a present to her for their 14th wedding anniversary. The frame is filled with photographs from their last 14 years together.

Chairs: Lloyd Flanders Outside Wicker Place

More Houzz Tours:
Cozy and Creative Home for 5
Artistic and Peaceful in Ann Arbor
Scandinavian Design with a Twist

See related

16 Crafty Ways With Spaces

Whether you are starting a handmade cottage business, want a better place for stitching and knitting supplies, or fantasy of a dedicated area to get your holiday wrapping, you might need some inspiration for organizing your space. Following is a group of some favorite inventive workrooms and storage closets filled with ideas to get you started.

Burnham Design

Utilize boxes and trays to keep things neat. Designer Betsy Burnham’s studio remains organized via shelves filled with white boxes and a string of functional trayscapes.

Martha O’Hara Interiors

Get the most out of a large laundry room. This distance by Martha O’Hara interiors combines an office, laundry area and craft space. O’Hara custom made the wrapping center rods and stands for this particular distance, which she dubs”Practical Magic.”

Martha O’Hara Interiors

Have a designer create a system to meet your needs. Here is a closer look at just how well organized the ribbons and papers are.

Michelle Hinckley

Have fun with colour. Among my favorite color combinations is yellow, black and white, and designer Michelle Hinckley has shone on that taxicab palette in this room. Her usage of symmetry keeps things balanced and pleasing to the eye.

Lots of us have searched high and low for reasonably-priced organizing boxes and magazine holders and have discovered the best deals are from IKEA. Caution: You are going to push your fingertips on those little metallic label tabs when you are placing them together, but they’re worthwhile.

The Locker

Utilize a combination of storage solutions. Flat files, cabinets and open shelving assistance Etsy artist and blogger Lockette keep her supplies organized.

Take over a large closet. This walk-in closet in an idea home was tricked out with rods for wrapping papers, hanging space for fabrics, and baskets for corralling craft supplies. The adjacent craft room remains neat and organized thanks to the closet.

Shoshana Gosselin

Take over a not-so-large closet. I understand most people do not have the luxury of a walk-in we can dedicate to crafts, not as an entire craft space. If this is true, consider transforming a two door closet to a craft space. This is a good use of a guest room closet. (See how this designer made her circle-inspired wall stencil.)

Watch more closet transformations

Perk up the backdrop. Reinvigorate your supply storage with fun paint or wallpaper like this mild aqua inside Vivian’s craft closet.

Watch more of the home

Make the most of built-ins. A wall of simple built-ins, along with the above IKEA boxes, transparent drawers and a countertop make the most of one little area of the room.

Surge – ATX

Bring in the experts. If you want to take it to the next level, have an architect, interior designer or closet company design an organizational strategy suited to all of your storage needs.

Contemplate a pegboard system. Borrow the pegboard idea from the garage workbench to hang organizational containers and rods. Paint it an inspiring color; this one is painted”Lakeshore” by Sherwin-Williams.

Paul DeGroot

Learn from a kitchen layout. A island in an art studio or craft space can function much as it will in a kitchen. It offers an extra work surface, drawers for tools and even flat files and/or slots for paintings and drawings. Its location in the middle of everything enhances efficiency.

Jeanette Lunde

Use distance all the way to the ground for storage. If an island is a pipe dream, boxes and baskets on the floor near your desk can assist you in keeping rolled-up programs, sketches and papers handy.

Van Wicklen Layout

Require over a guest space. Designer Jeanette Van Wicklen is blessed enough to have a guest home on her house. She turned one large, light and bright room to her style studio.

Watch the rest of the home

Get the most out of natural light. This studio is where artist Tjasa Owen gets the magic happen. Wall space, natural light and easels are important components for a painter’s workspace.

Watch the rest of the home

ZeroEnergy Design

Take over the attic. In case you have extra space in your attic and need a house studio, consider renovating it. Dormer windows and/or skylights can be added to allow in the natural light.

Watch the rest of the home

More:
7 Immediate Backyard Getaways
15 Ways to Be More Inspired by Your Studio
6 Homes and Studios Where Creativity Thrives

See related

Mountain Homes: Big Design for Majestic Places

I have just begun the design of a new residence in the Blue Ridge mountains of western Virginia. The property, more than 5 acres, is spectacular — heavily wooded, with a change in elevation of nearly 100 ft from front to rear. As the property slopes away, the treetops fall down showing mountain and forest vistas and a stream in the valley below.

As a portion of the design procedure, we looked in classic American mountain houses built in the 19th century ahead. In the Adirondacks to the Blue Ridge Mountains and beyond, there’s a specific aesthetic for a home in a wooded and mountainous site. Large and simple gable roofs represent the shape of the hills while readily shedding snow and rain. Big, tree-like timbers, frequently used as discovered on the website, support these roofs. All of this rests on neighborhood stone shaped into foundations, plinths and chimneys. The metal plates and anchors linking these elements have a heft and scale to match the surroundings.

These homes located in the wild have given up the refined elegance, gentility and limitations of the city. They are raw, natural and massive. And it’s this massiveness, this scale, that is quite fascinating about these homes. Built at the land of giants where mountaintops touch the skies trees reach for the skies and lakes seem bottomless, these homes can hold their own.

Turnbull Griffin Haesloop

Like big tents, the big and simple gable roofs on these homes define a place of refuge and reflect the landscape of trees and mountains.

Gelotte Hommas Architecture

Stone chimney, stone plinths and stone base anchor this home to its website while the roofing, like a fantastic tent arrangement, is supported on tree-like poles.

Gelotte Hommas Architecture

These metal roofs are unquestionably tent-like, stretched tight like fabric on a simple pole-like structure, appearing to float over the land.

Gelotte Hommas Architecture

Large expanses of glass maintain the interiors light and bright while capturing the house’s greatest views.

Highland Group

With numerous outdoor spaces and perched at the edge of the water, this needs to be a fisherman’s dream house.

Ward-Young Architecture & Planning – Truckee, CA

In the realm of giants, this house appears like a fairy-tale cabin in the woods.

Ward-Young Architecture & Planning – Truckee, CA

Beautifully crafted of large and small timbers — with a porch to sit on while listening to owls hooting at night — this house could have been built from what was discovered on-site.

More: Winter Woodsy Gets an Update
Lake Tahoe Escape
Creative Cabin on the Water
Dreaming of a House in the Woods

See related

Houzz Tour: Coastal Chic Family Getaway

Amy and Elizabeth Munger, the brains behind Houston-based Munger Interiors, are sisters with an eye for warm, family-friendly insides. When they were approached to design a beach house for a client with four small children, they knew exactly what to do. “Our client wanted to move in as quickly as you can, so we moved fairly fast with this,” says Amy. With the help of Potter Construction, the pair changed the waterfront house in Galveston, Texas into a posh, contemporary home (with lots of space for guests) in record time.

Because this was a house with children, and intended to sponsor guests, Amy and Elizabeth needed to incorporate materials which were easy to clean. Sunbrella fabric was used both inside and out, cotton duvets helped simplify maintenance, and sisal and seagrass rugs intended less vacuuming.

Apart from making this a guest- and – kid-friendly house, pair had no actual limitations on style. “We knew we wanted to do something a bit different for these, since their primary house is very traditional. So we opted for something a little more contemporary they wouldn’t normally have,” says Amy.

20 Spectacular Beach Houses | Browse beach-house photos

Munger Interiors

The living area Amy and Elizabeth first struck in the home is a far cry from this beautiful end result. “It was so dark when we saw it,” says Amy. “Lots of ceramic tiles, black granite, and terra cotta walls. It underwent this type of transformation — particularly for just cosmetic changes — and we could not be happier with it.” A simple white couch and armchair are accented by bright pink ikat fabric from Lee Jofa. This pop of colour remains grownup since the remainder of the decor remains quite neutral.

The pair of armchairs to the left are coated in a custom slipcover in Sunbrella fabric and trimming. A wooden coffee table from Custom Furniture LA keeps the tone of this space warm.

Munger Interiors

Because this was going to be a vacation house, and the clients were a societal bunch with children, they knew this was going to be a home that would have to host various quantities of individuals at different times. Setting up several little nooks in the living room means more people can sit comfortably in the area with the option of having multiple conversations at once. Except for the couch, the furniture isn’t hard to maneuver, which is excellent if an extra-large game of charades starts up.

The seats in this sitting room are from Restoration Hardware, and the floor lamp is from Arteriors. The table is from Restoration Hardware as well, but was fitted with a personalized zinc shirt.

Munger Interiors

A new beach house requires a new kitchen! Amy and Elizabeth chose an all-white farmhouse sink, and classic sink fittings from Rohl to your kitchen sink region.

Munger Interiors

All-white cabinetry and light countertops help maintain the fresh and airy feel in this spacious kitchen. Lucite barstools from Knoll add a bit of cool to the classic kitchen decor, and Restoration Hardware light fixtures over the bar provide a splash of industrial bling.

Munger Interiors

The turquoise chandelier from Arteriors is among Amy and Elizabeth’s beloved items in the house. “The client was a little afraid of it at first, since she thought it’d turn out too elaborate,” says Amy. “We needed to sort of convince her with this one, but once we put it in, it was fantastic.”

The cloths across the house have been considered carefully. Everything needed to be durable, and easily cleaned. The cushions on the dining room seats were coated with a end to create for easy cleanup. Amy and Elizabeth chose a matte finish to make the cushions less shiny and the end not as obvious. “That is something we wind up doing a lot for clients with families,” Amy says.

Munger Interiors

Color accents the wicker and teak outdoor furniture atmosphere. The impartial chaises came from Restoration Hardware, along with the sisters wanted to decorate it up with a couple of fun accessories. “Elizabeth is amazing with colour, so she chose our colour palette,” says Amy. “It was actually based on white — we knew we wanted it to be new — and organic tones, with splashes of colour throughout.”

Munger Interiors

Custom turquoise and white pillows were mixed with monogrammed accent pillows to add colour and personality to the home’s stunning waterfront deck.

Munger Interiors

An outdoor dining table and wicker chairs from Restoration Hardware sit under a pergola, with Sunbrella cushions and pillows for added comfort.

Munger Interiors

Even though the project had a rigorous deadline, the only other restriction in terms of decor was making sure there were enough beds to the large family and their guests. As it came to the design, Amy and Elizabeth were able to take the lead and work out the details of the home’s design. “This was a very wonderful working relationship,” says Amy. “We have a very similar sense of style as the client, and she had been so trusting. She was prepared to let us take some risks and use our best judgement.”

From the master bedroom, Amy and Elizabeth had a headboard made with a natural-colored sheet to cancel the all-white bedding. The white and navy table lamps from Arteriors sit along with side tables made with custom Pindler & Pindler fabric skirts and Lone Star Glass mirrored tops.

Munger Interiors

Before revealing the last result to the client, Amy and Elizabeth set up a special treat near the entryway. Four colorful towels with matching monogrammed buckets were awaiting the children on their first visit to the completed home. “We are very detail oriented, so we really try and take care of everything,” says Amy. “It was great. She was actually touched.”

Munger Interiors

From the hallway, Amy and Elizabeth made a beach-inspired vignette with an eclectic blue lamp from Arteriors plus a rattan tray atop a gray-washed sideboard from a store in Houston. “Our style actually runs the gamut,” Amy says. “I would say that our designs are almost always on the warm side, and we do a lot of family homes. I really don’t think we do very well with cold and minimalist designs, but we have done a little bit of everything style-wise.”

Munger Interiors

Three mini beds with custom headboards and plush Pine Cone Hill bedding create a perfect little bedroom for last-minute guests. The woven trunk baskets from IKEA at the foot of the beds are fantastic for storing sandy shoes. The teeny side tables between each bed are from Worlds Away.

Munger Interiors

After rushing around to get everything done on time, the install afternoon was an amazing moment for Amy and Elizabeth. “It was so fast and angry to that point, it was amazing to finally have a step back and put it all together,” says Amy. “We’re so thrilled with the results.”

In this bedroom, Amy and Elizabeth installed a sisal carpet for a durable and classic beach house feel. Custom linen headboards completed the look, and were dressed up with a white Arteriors table lamp along with a re-lacquered and nickel-plated chest of drawers which was already in the home. The mirror was in the customer’s Houston house, and only fit perfectly within this area.

Munger Interiors

A pair of bunk beds in the same room adds an extra pair of beds in a compact area. A wise pair of drawers beneath provides a tiny storage for guests, and sconces set to the wall create ideal reading lights.

Munger Interiors

A natural and white colour palette continues on in the baths, with a rough wooden mirror from Restoration Hardware along with an unpolished wood dressing table. The white spout was bought through Kiva Kitchen & Bath, and Amy and Elizabeth used metal as an accent on the fittings, glass cannisters, and the overhead light fixture from Circa Lighting.

More: 20 Spectacular Beach Houses

Browse beach-house photos

See related

The best way to Repair Sandstone Window Sills

Stone window sills include Old World appeal to a lot of buildings. If sills are sandstone, the stone tends to deteriorate with age, exposure to snow, rain and freeze -and-thaw cycles. While some do it-yourself websites suggest -based fillers, using resources, the proper mortar and strategy, homeowners can restore and preserve the normal look of sandstone window sills.

Make 3/4 inch cuts around any unsound location on the sandstone sill using a damp diamond blade. Cutting a boundary across the sandstone that is compromised makes chisel removing more specific.

Chip away the stone described by the diamond cuts using a pneumatic chisel and hammer. Tap the head to avoid trauma to the sandstone foundation also to eliminate broken sandstone.

Create “mechanical keys” in the sandstone sill. Tiny holes drilled to the stone foundation, or keys, should be inch in diameter. 1/2 1/2 inch comprehensive and Area the mechanical keys around 3″ apart in the event that you are fixing a huge portion of of the window-sill. Produce two rows of keys where sills are especially deep.

Before applying the patch, wash the sandstone area. Use a brush as well as water to eliminate sedimentation. In the event pollution or development discolors the sill, add 1 part household bleach to 1 5 parts water. Use mild strokes to avoid etching of the sandstone.

Mix 2 elements, 1 part portland cement TypeS lime, 6 elements water and sand to produce the slurry coat.

Spread a thin coat of the slurry layer to the sill together with the trowel and perform it to the surface. Concentrate in the stone on mechanical keys, cracks and ridges.

Mix 1 part portland cement, 1 component type-S 6 elements, lime water and sand for the scratch coat.

Spread the scratch coat on the sill using a trowel. Keep the scratch layer into a depth After implementing the first layer, rating in a crisscross pattern together with the trowel. Adhesion is created by scoring the moist patch for subsequent levels.

Wait two to four hours before applying all potential scratch levels, and the 2nd.

1 part white portland cement, 1 component TypeS lime, 2 to 3 parts sand, three or four components crushed stone artificial or organic — and water. Stones and pigments are added as required to coincide with the unique colour and texture of the sill.

Smooth on the the final coat having a trowel.

Allow the the conclusion coat to dry to your leather finish. The mortar needs to be awesome to the contact, company, but maybe not bonedry. You need to be in a position to etch it having a fingernail.

Any ridges and surfaces left using a moist sponge or using a towel-wrapped dowel from your mechanical keys.

See related

The best way to Clean Brick Veneer

Brick veneer offers most of the elegance of brick that is genuine without cost or the weight. Veneer consists of slender tiles of brick masonry mortared into place on both exterior or interior partitions. As the veneer is porous like bricks that are total, it it takes regular cleaning to appear its finest it becomes a magnet for dust, dirt and stains. Weekly mild cleanings mixed with the annual deep-cleaning is generally adequate to keep your veneer in best form.

Vacuum inside veneer surfaces using the brush attachment once-weekly. Outdoor veneer surfaces need rinsing with clear water to rinse dust and surface grime away.

Cover inside surfaces using a painter’s drop cloth to guard them in the cleaning solution. Put on a pair of rubber gloves to protect your skin in the cleaner.

Combine ½ cup of trisodium phosphate (TSP) with 1-gallon of warm water in a big bucket. Use a business brick cleaner combined according to package instructions.

Dip a stiff-bristled scrub brush to the TSP answer. The brick veneer area completely using the solution.

Rinse the brick with water that is obvious. Allow outside brick veneer to air-dry dry or inside brick using a towel.

See related

The best way to Stain a Deck

Decks offer an area to rest, unwind and entertain friends and your family while extending the living area of your house to the outdoors. By staining it maintaining your deck enhances its look and extends the life span of your deck. Staining a deck with latex deck stain needs some tough work — a long time of of energy above a period of many days — but the outcomes can last for years.

Prepare the the top of deck for staining. Remove grills, planters and furniture. Dirt and particles from your deck, using the broom.

Put in your safety goggles, facemask and gloves. Scrape any outdated chipped or flaky paint or stain in the deck, utilizing the paint scraper. Sweep the deck in the places which you scraped.

Wash the deck with deck clean that is commercially-prepared. Make your own answer of 1/4 cup dish soap to Allow the deck area to dry for 2 times.

Choose with temperatures between 50. Shake the can of latex deck stain.

Test the stain on a hidden part of wood. Use paint brushes or the paint sprayer to use the stain. Let the stain dry for 2 hrs and take notice of the the colour to make sure it is the colour you want for the deck.

With staining the the rest of the deck proceed. Use the stain evenly to prevent streaks and drips. Latex deck stains need one coat of stain. Allow the stain. If preferred apply another coat of deck stain.

Clean paint brushes or the paint sprayer as directed by the producer.

See related

The best way to Hang Extended Drapes on Brief Windows

Hanging drapes that are extended on a window that is brief is is among the the simplest methods to boost the value of the window and take it it to the area in to proportion. Drapes on a brief window window and drapery design and lessen the importance of the area, call attention to the dimensions of the window. The space and can also recommend the greatest size for them, bringing the style into harmony with all the room and its own usage will dictate the disposition and function of the drapes. The proper design and size will reduce window type that is bad as well as hint the window is much grander than it really is.

Make sure the drapes, when in the place that is open, expose as a lot of the window. The drapes should be at least 30% wider in relation to the window to completely expose the window. The illusion that is developed is the window extends behind the drapery that is open, raising the width that is perceived.

Consider the design of the area for course on the total size of the drapes. Formal, modern and contemporary rooms generally warrant ground -to-ceiling drapes. Drapes that puddle on the ground should achieve the ceiling or it’s going to appear the rod is hung low, as well as the drapes are also lengthy. Drapes, these that fall below the windowsill or quit half-way between the ground as well as the sill, are suitable for region or informal interiors. The amount of the drapes, particularly if in the closed place, will recommend the window is significantly taller.

Mount the rod at the top of the wall no issue exactly what the over all duration of the drape. Consider the the room required to to control the rod when when coming up with the very top of the drapery as well as the peak dedication should stay below the fringe of of any crown molding. Of all decor tips of illusion, this is the most successful a-T creating a tiny window is the most readily useful use of lengthy drapes on a brief window and appear bigger.

Establish a a rectangle that is a lovely with all width and the length of the drapes. The “Golden Rectangle” refers to your design concept the proportions of the sides of rectangles ought to be both three to five or five to seven. For instance, in the event the width of the drapery is 5 toes, a a delightful proportion for the duration is either 7-feet, or 3-feet, for quick drapes for lengthy drapes. The proportions should not be altered by situating a rectangle possibly vertically or horizontally.

See related

The best way to Stain a Banister

Staining a banister help protect the wood against daily wear and tear and changes the look and feel of the staircase. Varnish is accessible in different finishes that are gloss, in order to match the banister to your own room decor. It might have a little time to prep the region though staining isn’t difficult when the stairs are employed, and and further caution is required. While the children play outside through the summer, this task is best completed due to temperature needs. You may also take out the banister as well as watch them perform while you perform.

Unscrew the banister in the metal brackets. Lift to dislodge it from. If it’s perhaps not feasible to eliminate the banister, tape across the tops of balusters and newel posts to guard them. Cover the actions with plastic sheeting.

Wipe banister to remove dirt. Wipe both sides, bottom and the top.

Open doors and windows to ventilate work location if you didn’t eliminate the banister. Place a fan close to the very top of the stairs to blow the fumes away from your area if inadequate ventilation is available. Don’t level the fan straight in the banister.

Sand away the aged complete with medium-grit sandpaper built in to remove the end. Then sand using a fine-grit sandpaper. Use an account sander to attain places and difficult to clean the outdated complete out of grooves. As you sand to avoid splintering follow the grain of the wood.

Use a chemical stripper to eliminate the aged complete, if you should be working in a well-ventilated region and have eliminated the banister. Let the stripper then scrap the mess a-way and penetrate the stain. Discard right into a steel bucket.

Pre-stain the banister using a wood conditioner. On woods, without it, the stain will absorb including cedar and pine.

Stir the can of stain to re-mix settled elements.

Pour stain right into a paint t-Ray dip a delicate, clear fabric partly involved with it it.

Rub the banister with all the fabric for pore woods that are smaller. For mahogany, oak or ash, utilize the stain having a brush, functioning it deep to the pores. Use the stain evenly across the whole banister. Wipe excessive stain, after the grain of the wood as you go a-way.

Leave the stain to dry before the wood is darkish as you want, and repeat the method.

Mix the can of apparent varnish according to manufacturer’s guidelines. Pour the varnish right into a paint tray that is fresh.

Use the varnish with all the china bristle brush safeguard it and to seal the wood. Brush with all the grain and perhaps not against it. Don’t enable drips in the brush to run the wood across. To avoid them, before eliminating the bristles, faucet the brush on-the-edge of the paint tray.

Leave the varnish.

Sand the banister using a sponge. Wipe a-way the dirt with a tack fabric.

Apply an additional coat of the varnish just as you did the first.

Reinstall the banister or eliminate the plastic sheeting once the banister is totally dry, safeguarding stairs and the balusters.

See related

The best way to Take Aside Galvanized Pipe

Till they found that that it can corrode from within plumbers installed iron water-pipes. The only indication you might have of this corrosion is decreased water movement, as the pipes are ultimately blocked by the corrosion. You have to dis-assemble the area from the relaxation of the pipes, although it’s not difficult to to displace it with copper, if you’re able to determine the place of the poor area of of pipe. If there is actually a union in the area this is difficult. In the absence of a union, the pipes are being cut by the first stage in dis-assembly.

Turn the valve that controls water off. Flip off the primary water-supply for the home when there is not a a a separate valve for the area you are operating on. Open any taps attached to to the line and below it to allow water to drain up.

Try to to find a union you want to dis-assemble or in an area that is nearby. Change the union nut counter-clockwise using a pipe wrench in case you learn one. It should be simple to to show, but spray lubricant on it whether it’s it is caught considering that the nut was not in contact with water. The pipes will split up when the nut is free. Put a bucket beneath the the union to catch.

Cut through the pipe using a reciprocating saw fitted using a steel-cutting blade in the event that a union ca n’t be found by you. While you minimize to lessen vibrations hold the base of the of the observed from the pipe, and keep a bucket helpful to catch water.

Unscrew the ends of the pipe you separated in the fittings on each end. While you turn the pipe counter-clockwise with still another hold the fitting with one pipewrench. Spray lubricant the fitting having a torch to loosen the the bond in the event the pipe is trapped.

Work from the starting-point to eliminate just as much pipe as essential. If there’s one, attached to to that particular pipe, when you come to some tee, you will possibly need to cut the pipe linked to to the perpendicular socket or dis-assemble the union.

See related