Home ⁄ 2018 ⁄ April

The best way to Repair Sandstone Window Sills

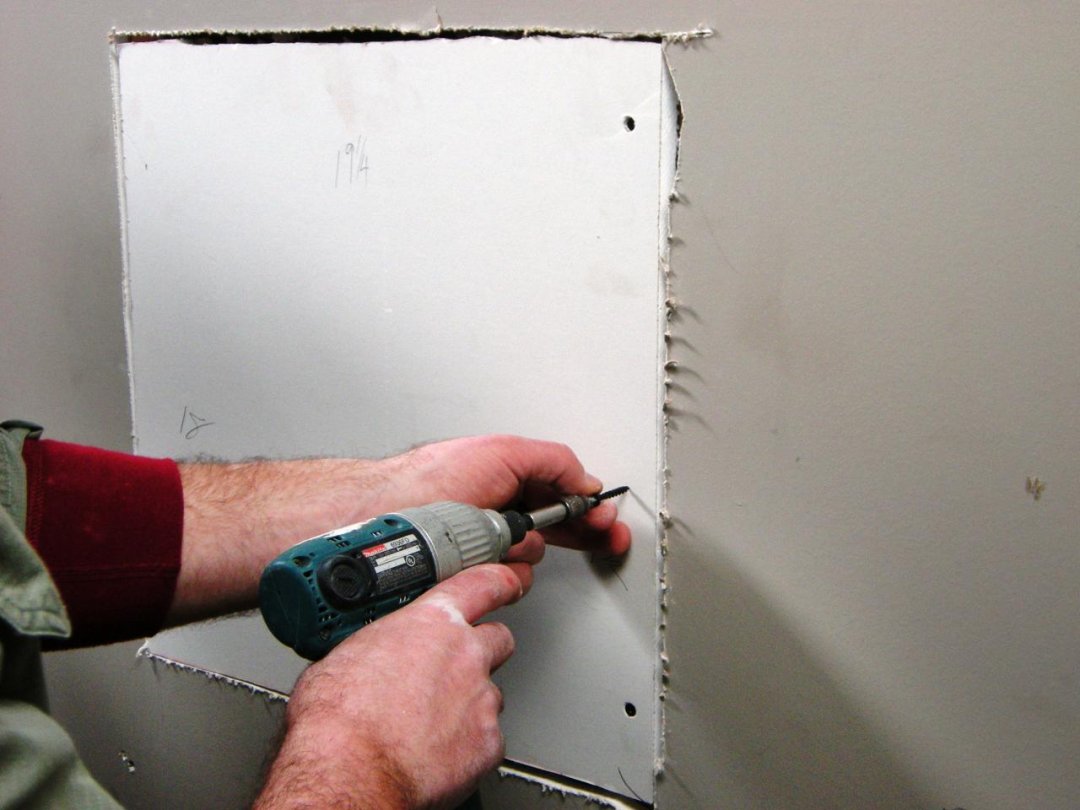
Stone window sills include Old World appeal to a lot of buildings. If sills are sandstone, the stone tends to deteriorate with age, exposure to snow, rain and freeze -and-thaw cycles. While some do it-yourself websites suggest -based fillers, using resources, the proper mortar and strategy, homeowners can restore and preserve the normal look of sandstone window sills.

Make 3/4 inch cuts around any unsound location on the sandstone sill using a damp diamond blade. Cutting a boundary across the sandstone that is compromised makes chisel removing more specific.

Chip away the stone described by the diamond cuts using a pneumatic chisel and hammer. Tap the head to avoid trauma to the sandstone foundation also to eliminate broken sandstone.

Create “mechanical keys” in the sandstone sill. Tiny holes drilled to the stone foundation, or keys, should be inch in diameter. 1/2 1/2 inch comprehensive and Area the mechanical keys around 3″ apart in the event that you are fixing a huge portion of of the window-sill. Produce two rows of keys where sills are especially deep.

Before applying the patch, wash the sandstone area. Use a brush as well as water to eliminate sedimentation. In the event pollution or development discolors the sill, add 1 part household bleach to 1 5 parts water. Use mild strokes to avoid etching of the sandstone.

Mix 2 elements, 1 part portland cement TypeS lime, 6 elements water and sand to produce the slurry coat.

Spread a thin coat of the slurry layer to the sill together with the trowel and perform it to the surface. Concentrate in the stone on mechanical keys, cracks and ridges.

Mix 1 part portland cement, 1 component type-S 6 elements, lime water and sand for the scratch coat.

Spread the scratch coat on the sill using a trowel. Keep the scratch layer into a depth After implementing the first layer, rating in a crisscross pattern together with the trowel. Adhesion is created by scoring the moist patch for subsequent levels.

Wait two to four hours before applying all potential scratch levels, and the 2nd.

1 part white portland cement, 1 component TypeS lime, 2 to 3 parts sand, three or four components crushed stone artificial or organic — and water. Stones and pigments are added as required to coincide with the unique colour and texture of the sill.

Smooth on the the final coat having a trowel.

Allow the the conclusion coat to dry to your leather finish. The mortar needs to be awesome to the contact, company, but maybe not bonedry. You need to be in a position to etch it having a fingernail.

Any ridges and surfaces left using a moist sponge or using a towel-wrapped dowel from your mechanical keys.

See related

The best way to Start a Fresh Tree From a Weeping Peach

The peachtree that is weeping is portion the of the genus Prunus and is cultivated because of its ornamental appeal rather than for its fresh fruit. The trees are generally small in size, making them an addition to the majority of landscapes. The beautiful pink flowers of the tree blossom in the spring and cascade gracefully toward the floor. In the event any fresh fruit is grown by the peach, it’s going to be inedible and tiny. Because of this, the tree is developed from cuttings rather than seeds.

Cut a 4- to 8 inch stem from a youthful and wholesome branch of a weeping peachtree using the knife. Following the tree is completed blooming, pick out the cutting in the spring. Choose a cutting with bark which is just starting to harden and lots of leaf nodes. Keep the moist by putting it and wrapping it in a damp towel.

Until it’s moist, add water and fill the propagation tray with all the mixture.

By removing any leaves from the lower part of the stem prepare the cutting. Cut in two these leaves than 1-inch whether there are leaves on the branch.

Roll the conclusion of the stem that has been cut to the hormone. Tap the cutting to eliminate any powder.

Place the cutting to the tray using the leaves over the rooting combination. Give each area in the event that you are planting over one slicing and don’t permit their leaves to contact.

Before the area is damp, water medium using a water mister lightly across the cutting. Place a plastic bag on the tray. This can keep the atmosphere moist. Full sunlight is not needed by the cuttings but should be stored in a location that is warm. Continually examine the cuttings and keep them moist using the water mister.

Allow roots to produce past a period of approximately 6 months. On the cuttings, tug by the end of the time. Roots have have become in the event you sense a minor resistance. Move the s Oil to test the period of the roots. When they’ve grown longer than 1inch, they’re strong enough to transplant in to 4inch nursery pots.

Wait 30 days before transplanting the cutting that is potted to your larger pot of planting medium. At this time, it is possible to transplant the youthful tree to its habitat that is permanent. The tree will prosper in sunny problems in United States Division of Agri-Culture hardiness zones up and 6.

See related

The best way to Grow Kang Kong

Kang kong (Ipomoea aquatica), a a family member of the sweet-potato, is recognized by several other names, including water spinach, swamp cabbage and Chinese water-cress. Kang kong may be developed in water or moist soil. It dies back when the weather turns dry or cool, and thrives in warm humid conditions. Stems and the leaves are edible, and in cooking they are employed extensively in Asia or consumed uncooked. Kang kong is extremely healthy, containing iron, calcium, protein and vitamins C and A. Grow kang kong outside in the Environment of Sunset Zones 2 through 25 and 6, 11, 17, or as a yearly nearly everywhere that reaches 85 degrees Fahrenheit.

Amend soil before planting a month with sulfur if required. Soil pH should be between 5.5 and 7.0. Plant kang kong within an area with partial shade or full sunlight and where the crops will have shelter from wind.

Saturate the soil. Kang kong grows in swampy places. It’s going to need to be watered everyday to keep the soil. Mix in manure or compost to include nutrients to the soil.

Cuttings or plant seeds spaced 6″ deep and 5 to 12″ apart. Fertilize using a high-nitrogen liquid fertilizer every two weeks .

Before flowering, one to two months after planting, harvest the plants. So the plant will continue to develop new shoots cut the stems 2″ over the soil line. In four to six months development may be cut following the cutting. Kang kong will increase long in warm, humid climate. It develop shoots in the spring in areas with cooler climate and will die in winter.

See related

Common Mistakes on Carpet Cleaning To Avoid

Many homeowners opt for carpet floors not only because they’re warm and inviting, but also because they’re low maintenance. That said, it’s important to have your carpet cleaned by a professional at least once a year or every 18 months at the most. That’s because no matter how frequently you vacuum, professional carpet cleaning Mobile a is required to extend the lifespan of your carpet. Plus, it comes with other benefits like reducing allergies and improving air quality.

DIY Carpet Cleaning Mistakes

While experts recommend hiring a professional to clean your carpets, some people hire a professional to clean one year and do it themselves the next one in order to cut costs.

While it’s possible to deep clean your own carpet, the professional route is always the most effective, because doing the cleaning yourself often comes with added risks like using methods that may potentially damage your carpet.

Here are some of the most common mistakes done by DIY carpet cleaners, which you should absolutely avoid:

Over-Shampooing – Using too much shampoo or not rinsing the carpet properly can lead to leftover shampoo that attracts even more dirt than before.

Over-Wetting – Using too much water is another mistake that’s done through DIY Mobile carpet cleaning. Some carpets don’t respond well to this method, and will immediately start to shrink and tear off, leading to irreparable damage and even cause mold problems.

Furniture Coming into Contact with Wet Carpeting – Most DIYers neglect to remove furniture from the room before they start cleaning the carpet. Unfortunately, the wetness of the carpet makes some of the wood furniture release dyes that stain the carpet while furniture with metal framing or feet will start to rust as a result of the exposure, leading to even more stain problems.

On the other hand, professional carpet cleaners come with tools like foil-backed cardboard squares and foam backs which help to keep the furniture separated from the carpet until it is dry.  

Professional Mobile carpet cleaners Methods

One of the methods used by professional carpet cleaners is known as dry extraction, and it involves applying just the right amount of pressure needed to give the carpet a deep clean without leaving it soaked. This approach is a bit similar to the DIY ‘dry method’, except for the fact that professionals actually use bigger and more effective equipment.

It’s interesting to note that the same chemicals used in the wet method are also used in the dry method. The only difference is that the dry method uses these chemicals differently. A machine that has counter-revolving brushes is used to make sure that the chemicals penetrate deeply into carpet fibers.

Then, all the dirt is lifted, leaving behind a clean carpet that you can just vacuum and start using almost immediately. The best part is that this method eliminates the use of oils and detergents that attract more dirt into the carpet, and although it’s very powerful, the machine works very gently on the carpet.

Grub Worms as Pests on Zucchini Plants

“Grub” is a phrase generally employed to explain worm like insect larvae. Horticulturalists in the University of California have determined the larvae of four bugs as the primary grubs that feed on the leaves, stems and fruits of summer squash (Cucurbita pepo), including zucchini, straightneck, crookneck and scallop squash. A grub feeds on germinating seed that is zucchini.

Armyworm Grubs

Larvae of the western yellow-striped armyworm (Spodoptera praefica) and the beet army worm (S. exigua) might prey on zucchini crops. The yellow- grub is 1 1/2 The green to beet grub, which is challenging to to manage, is 1 1/4 inch-long. Spraying zucchini crops with B.t (Bacillus thuringiensis) a microorganism acquired from soil bugs, is a suitable natural handle. B.t inhibits the grub’s digestive tract. Horticulturalists at University of California-Davis suggest spraying an insecticide containing the active ingredient carbyl. Use or you have to get a permit out of your county agricultural commissioner to purchase carbyl.

Leafminer Grubs

The larvae of the two species of black and yellow leaf miner flies (Liromyzid trifolii and L. sativae) produce winding tunnels in zucchini leaves, causing them to dry. The grubs will kill the crops, and typically infest zucchini in the period, creating yields of zucchini. These grubs are less than 1/10 inch-long. and bright-yellow Releasing the commercially-available parasitic wasps Chrysocharis spp and Diglyphus spp is the the easiest method to to to manage leafminers. The grubs are hard to to manage once they burrow to the leaves. Containing the active ingredient Abamectin, very toxic to honey bees, are beneficial against L. trifolii. Insecticides containing the substances oxamyl esfenvalerate and dimethoate are successful against L. sativae. Use or you have to get a permit out of your county agricultural commissioner to purchase these pesticides.

Cucumber Beetle Grubs

Western striped cucumber beetles (Acalymma trivittatum) lay their eggs in the bottom of zucchini crops. As quickly as the eggs hatch, the larvae start consuming roots and dig to the soil. There isn’t any method to destroy the larvae, however you can control the grownups, which are about 1/3 inch-long. and yellow with three stripes down their backs The beetles cause harm to zucchini in the period. There aren’t any effective cultural or biological controls. The most successful pesticides, these containing the substances endosulfan, esfenvalerate or carbaryl, need an allow out of your country commissioner to acquire or promote. Less efficient pesticides containing Prokil Cryolite or Cryolite don’t need authorization use and to buy. They harvesting the zucchini and they might require week or two between their use.

Cabbage Looper Grubs

Cabbage loopers (Trichoplusia ni), whcih are light-green, arch their back as they crawl. Their larvae strip underneath of the leaves, and many them can transfer onto the zucchinis. Commercially accessible parasitic wasps (Trichogramma spp) prey on cabbage looper eggs and certainly will be an efficient get a handle on. Apply B.t (Bacillus thuringiensis) to the flat white eggs which are found about the undersides of leaves. Horticulturalists in the College of California-Davis listing the pesticides containing these components in buy of usefulness: Spinetoram prokil methomyl and cryolite.

Seedcorn Maggot

The legless white seed-corn maggot (Delia platura), the larvae of a tiny grey fly, is about 1/3 inch-long and attacks germinating zucchini seeds and transplants before the climate warms in the spring. They trigger most harm when residue of the prior crop h AS not carefully decayed before zucchinis are planted. Till or plow moist hefty s Oil early in the period to inspire the decomposition of residues. Don’t plant zucchini. Late period planting could be helpful. The remedy that is most useful is the program of the pesticide metam sodium on the seeds 2 weeks before planting use or You got to get a permit out of your county agricultural commissioner to purchase metam sodium.

See related

Interesting Facts About Portable Toilets

Whether you love them or hate them, plumbers LA Jolla CA are no doubt one of the most useful things ever invented. They may not be the most fascinating things that you get to use every single day, but there are actually lots of interesting facts about them that are definitely worth knowing.

Below are some fascinating facts about portable toilets that only a few people are aware of.

It All Started in the 1940s

It was during the World War II that the first portable toilet was invented. Owners of shipyards in New Jersey realized that their employees were actually losing lots of valuable work time by having to walk to and from the docks just to use the toilet. That’s why they decided to come up with LA Jolla plumber made of wood that was equipped with a small holding tank. This resulted in more productivity at work and happier employees.

The Invention of Luxury Portable Restrooms

Luxury LA Jolla plumber are now available and they are also known as luxury restroom trailers. What used to be a temporary fix for a problem on ships, which only had bare necessities, has now greatly evolved and has been upgraded into a trailer equipped with all the modern conveniences of a typical toilet. The luxury restroom trailer comes with running water, air conditioning system, full-sized mirror, lights and decor, similar to your toilet at home.

The First Toilet in the Row is the Cleanest

According to some experts, in a row of toilets, it is the first toilet that is considered the cleanest since it usually has fewer users. This is because most people think that all toilet users would opt for the first toilet and so they will instead go further. So when you need to use a toilet in a public place, you better opt for the first one.

There Were 5,000 Toilets On Site for Obama’s Inauguration

It’s been said that around 5,000 portable toilets were assembled on site during the inauguration of President Obama. While this might seem like a huge number, all toilets were actually used. There were about 1.8 million people who attended the event, which means that around 360 individuals used each of the toilets.

Portable Toilets Help Save Water and Protect the Environment

Using LA Jolla plumbing is actually a good way to save water and protect the environment.

Here are some facts to prove this:

-Americans use more water in flushing toilets than they do when showering.
-Around 45 billion gallons of fresh water will be saved each year if people use portable restrooms.
-A conventional toilet wastes up to 200 gallons of water every single day, while a portable toilet uses 90 percent less of what a conventional toilet would use.

Ancient Portable Toilets Were Placed in Tombs for Use in the Afterlife

During the ancient times, portable toilets were placed in tombs in order to be used in the afterlife. This was discovered when the tomb of a senior Egyptian official was excavated and it revealed a wooden stool that had a slot in the middle.

The best way to Plant a Yucca Aloifolia

Yucca aloifolia, generally called dagger plant or bayonnet, is a member of the plant family Agavaceae, in the yucca. Widely planted as an multi-stemmed shrub or small tree, yucca aloifolia provides abundant greenery and visual interest to the backyard and is drought-tolerant. A slender trunk is presented by the tree with long, swordlike leaves that are leathery. The plant grows from 5 to 20-feet tall at maturity. Native to coastal location sand-dunes in the south-eastern part of the United States, the perennial plant grows best in a sunny, Mediterranean type environment and does nicely in U.S. Department of Agriculture hardiness zones 8a through 10b.

Select a full-sunlight, well-drained area for planting. Dig a hole broader and 8 to 12″ deeper in relation to the root mass of the plant. Use a garden wagon or wheelbarrow to transfer the plant. Using the wheelbarrow or wagon, scoop the soil removed in the hole up and transfer it to a different location or the compost pile .

Prepare 2 parts soil, a mixture of 3 components backyard sand and 2 elements natural compost. Blend thoroughly. Place 2 to 4″ of the potting mixture in the base of the hole. Place the Yucca aloifolia plant in the hole, as formerly planted planting to the same depth. Spread the roots out in the underside of the hole. The hole three quarters full of the mixture. Add water to fill the hole and allow to drain. Watering as you plant will help to remove air pockets round the roots. Add more of the mixture to fill the hole. Tamp the soil and water.

Cover the soil area throughout the plant using a 2- to 3 inch layer of bark or other organic mulch. Water lightly throughout periods of prolonged drought.

See related

How to Patch Cracks and Holes in Drywall

The ceiling or your wall may sometimes get damaged during routine repairs, and you should fix these damages as soon as possible. The good thing is that you can fix them properly without even having a repair kit, or having to spend a lot. All you need is some window screening, a handyman Hialeah scrap, joint compound and some simple tools.

A good method of getting this done is by cutting a hole that will fill the patch. Look for a drywall scrap that is as thick as the part that you need to fix. Cut a section out of it, big enough to cover the hole you need to repair. With the patch covering the hole that you want to fix, draw an outline with a pencil. Indicate with an arrow, where you will place the patch.

Prepare the Hole

With a handyman Hialeah FL saw, cut the corners of the outline. Use a utility knife to score the outline. Pull the pieces from within the outline, and then remove them with a knife.

Cut pieces of wood strapping. Make sure the height of the hole is about 6 inches smaller than the strapping size. Squeeze adhesive along the perimeter of the wood strapping, and then insert it inside the hole, making sure the adhesive side is facing you.

Pull back the strapping against the damaged part and then use two screws to hold it into position. Be very careful when inserting the screws, so that they are inserted just underneath the surface of the wall, but not too far.

Attach the Patch

Following the outline you indicated with an arrow earlier, make sure the patch is aligned to the arrow. Firmly press the adhesive against the patch and drive two screws into the strapping through the patch.

Cover the Seams

Use a taping knife to apply a thin layer of joint compound over the screw heads, the seams, and the patch.

Measure a section of the window screen that is a few inches larger than the patch that you need to cover. Using the taping knife as a trowel, press the window screen on the compound. Why should you use a window screen? It will help you prevent the formation of cracks between the wall and the patch.

Prepare more of the compound and add the muddy mixture, then carefully trowel away from the overflow. In order to prevent wrinkles on the screen, work from the middle of the patch outwards.

Allow the handyman Hialeah FL to stay undisturbed until the following day. After checking if the compound has dried properly, use a taping knife and add a second layer. Work over it until it smoothens out to 6 inches away from the boundary of the coat applied the previous day. Leave it to dry and use sandpaper to smoothen it.

Be careful not to expose the screen while you are sanding it out. Your wall should be ready for painting once the dust has been wiped away.

The best way to Treat White Rosebush Scale

White rosebushes do not require treatment that was very challenging and really are a classic addition to any house backyard. The bushes, nevertheless, might become infested. Your first indication of a scale infestation will be the look of your roses. They droop will yellow and fail to create flowers. Each kind of scale infestation leave and will feed waste in your plant. Not the insect itself, the waste, is what makes it appear ill and damages the plant.

Appear under leaves and put in your gloves, on stems as well as to the flowers of your rosebush. Take them off in case you see scale bugs and toss them in a garbage-bag. Create a record of areas with large infestations. Scale bugs are between 1.5 and 5 millimeters long. Immature and female scale insects have no parts of the body that are distinguishable; they will simply seem to be a spherical colony of fungus on the plant. The texture may be cottony or waxy and easy, difficult. Scale bugs, about another hand, have wings. Scale bugs are typically brown, grey or white.

Prune areas with large infestations. Use your shears to remove leaves, blossoms that are broken and contaminated branches. Throw whatever you have cut to the trash bag.

Look beneath the bottom of the bush for sticks, branches and leaves which have fallen off throughout the infection or parts you missed. Throw them away.

Pour oil right into a spray bottle. Coat the contaminated rose any around and bush rosebushes using the oil to prevent further infestations. Use the oil yearly in the first spring.

See related

Which S Oil Is Most Useful for Planting Tomatoes?

Tomatoes (Lycopersicon esculentum) are the most popular home garden crop in the in the united states, plus it is not difficult to see why. Highly adaptable and easy to develop, tomatoes can prosper in many circumstances and climates, including the Environment Zones 1 through 24 of Sunset. Like every garden vegetable, needless to say, tomatoes require the correct type of soil to create the finest crop.

Types and Textures

These crops will increase in nearly all soil types except large clay, although loam and sandy loam soils are most useful for tomato production. If you-your soil has plenty of clay, it is possible to improve the texture by integrating peat moss, sawdust, sand or amendments and tilling the soil. The soil needs to be well and pretty free -drained. Tomatoes do not do well in soil that is dry, but avoid anyplace standing water gathers, or planting them in exceptionally moist, water-logged soil.

Soil pH

The acidity or alkalinity of soil is measured by its own pH. While something lower is acidic and anything greater is alkaline a pH of 7 is considered neutral. Tomatoes grow best in neutral or near-neutral soil, and that means you might need to to change the pH for best outcomes of your soil. By integrating floor agricultural lime to the soil if required, it is possible to raise pH. It’s possible for you to lower pH by adding fertilizers or sulfur which contain ammonium sulfate.

Fertility

Tomatoes grow well in reasonably fertile soil with a lot of organic matter. When you prepare the soil, compost can be incorporated by you. Adding an all purpose fertilizer containing phosphorous and potassium can be beneficial. Fertilizers with high-nitrogen content, because these can result in crops that generate fresh fruit that is tiny. An excellent kick off point when you ready your your garden is to have your s Oil examined. Soil check kits are accessible at your closest college extension workplace along with most backyard shops. The outcomes of the s Oil check will expose pH and content, as properly as make strategies for for s Oil amendments.

Growing Tomatoes in Containers

You can develop them, although tomatoes are often grown in a outdoor garden. Container developing does have a benefit because it enables you full get a handle on within the medium that is expanding. A best potting combine for tomatoes consists of equivalent components potting compost, perlite, sphagnum peat moss and soil.

See related