Home ⁄ 2018 ⁄ April (Page 2)

3 Tiny Houses That Have More Storage Than Your Home

Supersized handyman services Pueblo CO are growing in popularity as they are cost-effective and eco-friendly. Smaller spaces are much easier to customize. For example, if your home has wheels, then you can definitely drag it across the country!

Although living in a handyman Pueblo CO is appealing, it also comes with a few challenges. One is pretty obvious: looking for space to fit all your belongings. After all, you don’t want clutter especially if you have limited space. Instead, what you’d want is plenty of space for you to move around.

There are creative and genius approaches that have solved this particular issue. The unexpected yet elegant tiny homes we will present you will make you realize that it’s still possible to maintain an airy, open feel even when you’re living in a tiny home.

The Tiny Giant

Alpine Tiny Homes, a Utah-based custom home builder, built what they dubbed as the Tiny Giant. The tiny house stands out not just because of the incredible storage space it offers, but also because of the interesting design choices that have been incorporated in it. The house is 39 ft long, and its exterior uses Shou Sugi Ban, a Japanese technique which involves charring of wood in order to preserve it.

Inside the house, the total floor space is 390 sq ft. The interior includes an entertainment center, a kitchen, a living room, and a home office area. Surprisingly, there’s only one bedroom, measuring about 17 ft which makes it very spacious. Another interesting aspect of the house is the bathroom which includes a bathtub that’s made from repurposed horse trough.

The Tiny Giant has its own solar power system which enables it to run completely off-the-grid. It also has its own water tanks for all types of water including black, gray, and fresh. The home was sold just recently for $70,000.

Vintage XL

This one is from Escape, a firm based in Wisconsin. Vintage XL is only 30 ft long, but its clever design allows it to offer 355 sq ft of floor space. This tiny home can house eight people in it!

The interior layout of the Vintage XL sports a conventional cottagey aesthetic. It’s centered around a beautiful open living space that includes a couch which can be converted into a bed. There’s a kitchenette, fold-down dining table, range cooker, refrigerator, and full-size sink, and they all handle the dinner duties. As for the bathroom, it boasts of a shower and a bathtub.
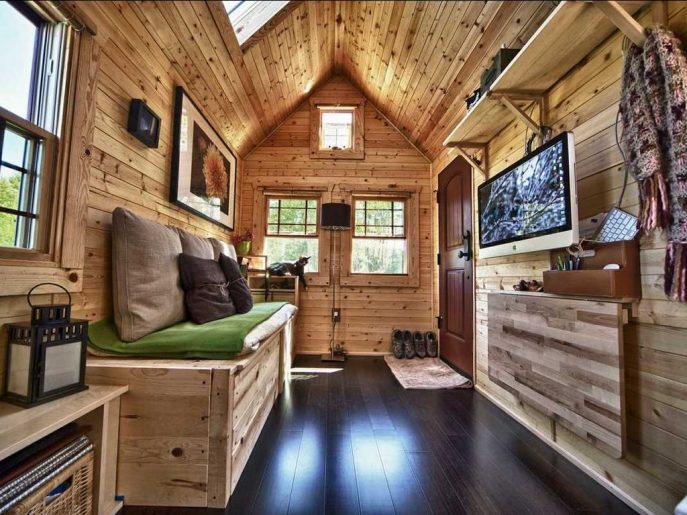
Green Cottage

This tiny home is owned by Tom and Shaye who decided to construct their own home in order to save money as well as gain control over the resulting structure’s quality. This trailer home is named Lucy and has a total floor space of 186 sq ft. DIY House Building, the couple’s website, has put this tiny house’s plan up for sale in case people would want to model their homes to the couple’s tiny home.

10 Really Easy Ways to Unclog Drains

The warning signs of a clogged drain are pretty obvious. You will notice the sink draining slower than usual, water pools around your feet when you are taking a shower etc. The odor is the worst of them all. That’s when you know something is not right and you need professional cleaning services Tucson as soon as possible. But forget about the experts for a minute.

Below are some simple ways to clean the drains on your own, and spend close to nothing in the process.

Boiling Water

This is perhaps the easiest solution. Boil some water, as much as your kettle can hold, and then slowly pour it down the drain. Allowing a few seconds between sets, pour the water slowly three or four times.

Bent Wire Hanger

This is another simple method to unclog a blocked drain. Straighten a wire hanger and curve a hook at the end. Push it further into the drain and then pull it back. You will be surprised at the stuff that you will pull out, usually hair. When you are done, run some hot water down the drain.

Pipe Cleaning

Emptying the trap underneath the sink is another simple solution. Set a bucket under the trap. Get a wrench and loosen the trap. Empty the content into the bucket. Remove any debris stuck in the trap and pipes that hold it in place. You can use an old brush to scrape off the gunk, rinse and return the trap to its position.

Caustic Soda

While caustic soda can cause burns, it’s an effective way of doing house cleaning Tucson. You will need eye and glove protection for this. Stir some caustic soda in a bucket until it fizzes and heats up. Pour this mix into the drain and give it about 20 minutes. Flush the drain using boiling water.

Wet and Dry Vacuum

If you have a wet and dry vacuum, you are in luck. Program it for liquid vacuuming. To avoid a messy work environment, cover the vent. Create a very tight seal around the drain cover. Once you have the area airtight, turn the vacuum to the highest setting and the power will unclog the drain.

Baking Soda and Salt

Mix half a cup each of baking soda and table salt and pour it into the blocked drain. Give it 15 minutes to settle and then rinse the drain with boiling water. It’s the chemical reaction of salt and baking soda with boiling water that will clear most of the blockages.

Vinegar and Baking Soda

Mix a third a cup each of vinegar and baking soda. As soon as it starts fizzing, pour this mix into the drain. The fizzing unclogs the grime and gunk that’s blocking the pipes. Allow it to settle for one hour at least. Flush the mixture with hot water. Another option is to pour dry baking soda into the drain and then pour vinegar.

Dish Detergent

For a clogged toilet, a quarter cup of dish detergent can do the trick. Pour the dish detergent down the bowl and follow through with boiling water. The lubricating effect of the soap will break down any residue. Start plunging and then flush.

Baking Soda, Pressure, Gravity, and Vinegar

Prepare a mixture of baking soda and vinegar as discussed earlier. Cover the drain with a stopper and fill up your bathtub. After an hour, remove the stopper. The pressure that comes from more than 50 gallons of water in the bathtub is enough to wash out any blockage that was loosened by the vinegar mixture.

Drain Snake

This is simply a flexible and long metal rope which has a spiral attached at the other end and is useful in unclogging a blocked drain. It’s the simplest way of doing Tucson house cleaning.

How To Install Drywall Like A Professional

The use of drywall in creating ceilings and interior walls has taken hold over the last few years. A lot of people are looking at drywall as a simple, effective, and affordable solution for internal walls and ceilings and the great thing is that you can indeed install it on your own without any issues. But it’s not a simple walk in the park. Although Aurora siding can take a few simple steps, for someone who’s doing this for the first time, things can get a little complicated. You need a guide and we have one for you.

Here are a few simple DIY steps that you should take when installing drywall in your home:

Step 1 – Installing Supporting Screws

The first step is to install the supporting screws. Start by leaning a piece of drywall against the wall horizontally. Go ahead and drive long screws on the studs that are often close to the edges of the same drywall that you want to install. The screws need to be left protruding from the studs in order to be able to support the drywall that’s about to be installed.

Step 2 – Mark the Wall

You will need a framing square and a pencil for this job. You will then go ahead and draw light lines on the drywall so that the areas where the studs are located are clearly marked. This will make it easier for you when you are driving the screws in.

Step 3 – Securing the Upper Piece of the Drywall

The third step is to now secure the drywall to the studs using the screws. The screw head must be driven in so that it’s slightly below the paper surface. Some people may be tempted to over tighten the screws but this is a mistake. In case you accidentally drive these screws beyond the paper surface, remove and drill another screw next to it but this time do it right.

Step 4 – Installation of the Lower Piece

Start this step by removing the supporting screws that you installed in step 1. Once this is done go ahead and lean the bottom part or piece of the drywall on the wall. The stud lines should then be transferred to the piece and then use screws to secure the drywall to the studs. Finalize by applying the mesh tape along the joints between the two pieces. You are also advised to apply joint compound at this stage.

Step 5 – Sanding the Surface

Once you do vinyl siding Aurora, CO, it has to be smoothened out. You will need to sand the surface very carefully. However, this can only be done once the joint compound you applied in step 4 above is dried. Once the sanding has been done and the joints smoothened out, go ahead and apply the primer and the paint. This process should be repeated until the drywall becomes smooth.

Well, these are some of the simple steps that you should take in order to install drywall and as you can see, they are quite simple.

The best way to Grow Wheat Grass With Seaweed Fertilizer

A lot of people harvest it a long time before before it grows in to wheat stalks, although wheatgrass is the small shoots of the wheat plant. Juicing advocates and health foods press wheat grass right into a juice that is green stated to be stuffed using a a great deal of of nutrients. Wheatgrass is an easy plant to increase, and you also will enhance your plants together with kelp, or the with the help of of a sea-weed. This fluid fertilizer contains several nutrients that could make the taste of wheat grass juice more palatable and aid seeds to develop stronger and quicker.

Wheatgrass seeds, or wheat berries, right into a medium bowl. Fill the bowl with water and enable the seeds to soak for eight hrs. Strain the seeds having strainer or a colander.

Fill the flat with a 2 inch layer of potting soil. Pour the seeds within the soil and enable the area to be sat on by them. So they are close together-but not on top of every other, spread out the seeds. There ought to be a strong layer of seeds within the the soil.

Moisten the planting medium completely. Cover the loosely and place it away from sunlight.

Inspect the seeds and keep the soil moist. Remove the plastic wrap when the seeds start to sprout.

Pour 2 tablespoons of kelp or seaweed fertilizer in to a clear spray bottle, adding 1/4 teaspoon of baking-soda. Fill the bottle and shake it to to combine the components.

When the wheat-grass is developing the developing stems using the seaweed fertilizer blend every day. This can help feed the wheat grass, as well as keep mildew from forming on the crops.

See related

The best way to Clean Brick Veneer

Brick veneer offers most of the elegance of brick that is genuine without cost or the weight. Veneer consists of slender tiles of brick masonry mortared into place on both exterior or interior partitions. As the veneer is porous like bricks that are total, it it takes regular cleaning to appear its finest it becomes a magnet for dust, dirt and stains. Weekly mild cleanings mixed with the annual deep-cleaning is generally adequate to keep your veneer in best form.

Vacuum inside veneer surfaces using the brush attachment once-weekly. Outdoor veneer surfaces need rinsing with clear water to rinse dust and surface grime away.

Cover inside surfaces using a painter’s drop cloth to guard them in the cleaning solution. Put on a pair of rubber gloves to protect your skin in the cleaner.

Combine ½ cup of trisodium phosphate (TSP) with 1-gallon of warm water in a big bucket. Use a business brick cleaner combined according to package instructions.

Dip a stiff-bristled scrub brush to the TSP answer. The brick veneer area completely using the solution.

Rinse the brick with water that is obvious. Allow outside brick veneer to air-dry dry or inside brick using a towel.

See related